C++11 多线程编程基础(下) 六、std::lock_guard 和 std::unique_lock 参考:std::lock_guard 与 std::unique_lock
01.主要作用 std::lock_guard会在构造函数时自动加锁,析构时自动解锁, 比较常用
互斥锁会在std::lock_guard对象生命周期结束时自动解锁
std::lock_guard是C++标准库中的一个用于管理互斥锁的RAII(资源获取即初始化)类。
它的主要作用是在创建std::lock_guard对象时自动锁定一个互斥锁,当std::lock_guard对象生命周期结束时,会自动解锁互斥锁,
这样可以确保在一段作用域内互斥锁的正确使用,避免了忘记解锁或因异常而未解锁锁的问题。
std::unique_lock主要特点是可以对互斥量进行更加灵活的管理,包括延迟加锁、条件变量、超时等, 但所占资源也会变多。
std::unique_lock在离开作用域后,会触发析构自动解锁。
try_lock_for是C++标准库中std::mutex类的一个成员函数,用于尝试在一段指定的时间内获取互斥锁。
如果在指定的时间内未能成功获取锁,它会返回一个表示获取失败的结果。
这个函数通常用于避免在多线程环境中出现死锁或长时间的阻塞。
02.程序示例 std::lock_guard
1 2 3 4 5 6 7 8 9 10 11 12 13 14 15 16 17 18 19 20 21 22 23 24 25 26 27 28 29 30 #include <iostream> #include <thread> #include <mutex> std::mutex mtx; void foo () std::lock_guard<std::mutex> lock (mtx) ; std::cout << "Thread " << std::this_thread::get_id () << " is inside the critical section." << std::endl; std::cout << "foo()... " << std::endl; } int main () std::thread t1 (foo) ; std::thread t2 (foo) ; t1.join (); t2.join (); return 0 ; } Output: Thread 140606635099904 is inside the critical section. foo ()...Thread 140606626707200 is inside the critical section. foo ()...
std::unique_lock
1 2 3 4 5 6 7 8 9 10 11 12 13 14 15 16 17 18 19 20 21 22 23 24 25 26 27 28 29 30 31 32 33 34 35 36 37 38 39 40 41 42 43 44 45 46 47 48 49 50 51 52 53 54 55 56 57 58 59 60 61 62 63 64 65 66 #include <iostream> #include <thread> #include <mutex> int a = 0 ;std::timed_mutex mtx; void func () for (int i = 0 ; i < 10 ; i++) { std::unique_lock<std::timed_mutex> lg (mtx, std::defer_lock) ; if (lg.try_lock_for (std::chrono::milliseconds (200 ))) { std::cout << "Thread " << std::this_thread::get_id () << " acquired the lock." << std::endl; std::this_thread::sleep_for (std::chrono::milliseconds (300 )); a += 1 ; lg.unlock (); } else { std::cout << "Thread " << std::this_thread::get_id () << " couldn't acquire the lock." << std::endl; } } } int main () std::thread t1 (func) ; std::thread t2 (func) ; t1.join (); t2.join (); std::cout << "a: " << a << std::endl; std::cout << "over" << std::endl; return 0 ; } Output: Thread 140379742152448 acquired the lock. Thread 140379733759744 couldn' t acquire the lock. Thread 140379742152448 acquired the lock. Thread 140379733759744 couldn' t acquire the lock. Thread 140379742152448 acquired the lock. Thread 140379733759744 couldn' t acquire the lock. Thread 140379733759744 couldn' t acquire the lock. Thread 140379742152448 acquired the lock. Thread 140379733759744 couldn' t acquire the lock. Thread 140379742152448 acquired the lock. Thread 140379733759744 couldn' t acquire the lock. Thread 140379733759744 couldn' t acquire the lock. Thread 140379742152448 acquired the lock. Thread 140379733759744 couldn' t acquire the lock. Thread 140379742152448 acquired the lock. Thread 140379733759744 couldn' t acquire the lock. Thread 140379733759744 couldn' t acquire the lock. Thread 140379742152448 acquired the lock. Thread 140379742152448 acquired the lock. Thread 140379742152448 acquired the lock. a: 10 over
七、std::call_once与其使用场景 参考:std::call_once与其使用场景
01.std::call_once用法
#include
void call_once(std::once_flag& flag, Callable&& func, Args&&… args);
注意:std::callonce()只能在线程函数里使用
std::call_once()用于确保一个函数只被调用一次,即使在多线程环境下也可以安全使用。
它通常与懒汉式单例模式一起使用,以确保只有一个实例被创建,这对于初始化全局资源或单例对象非常有用。
主要作用是在多线程环境下实现延迟初始化(Lazy Initialization)或执行某个操作的单次初始化。
其中,flag是一个std::once_flag类型的对象,用于标记函数是否已经被调用;
func是需要被调用的函数或可调用对象;args是函数或可调用对象的参数;
如何使用std::call_once:
需要包括<mutex>头文件,因为std::call_once依赖于互斥锁。
创建一个std::once_flag对象,用于标记某个操作是否已经被执行。
定义需要保证只执行一次的函数。
在需要执行的地方调用std::call_once,将标记对象、需要执行的函数以及函数的参数传递给它。
用法示例,
1 2 3 4 5 6 7 8 9 10 11 12 13 14 15 16 17 18 19 20 21 22 23 24 25 26 27 28 29 30 #include <iostream> #include <thread> #include <mutex> std::once_flag flag; void initialize_resource () std::cout << "Resource initialized by thread " << std::this_thread::get_id () << std::endl; } void lazy_initialize () std::call_once (flag, initialize_resource); std::cout << "call_once()... " << std::endl; } int main () std::thread t1 (lazy_initialize) ; std::thread t2 (lazy_initialize) ; t1.join (); t2.join (); return 0 ; } Output: Resource initialized by thread 139859893565184 call_once ()...call_once ()...
02.实现日志类(多线程环境) (1).局部静态变量实现懒汉单例 使用单例模式实现的日志类,下面是最常见的懒汉式单例设计模式的写法(使用局部静态变量方式)
同时,也要注意某些操作可能会导致的数据竞争问题,需要进行加锁操作;
1 2 3 4 5 6 7 8 9 10 11 12 13 14 15 16 17 18 19 20 21 22 23 24 25 26 27 28 29 30 31 32 33 34 35 36 37 38 39 40 41 42 43 44 45 46 47 48 49 50 51 52 53 54 #include <iostream> #include <string> #include <thread> #include <mutex> #include <iomanip> class Log {private : Log () {}; Log (const Log &) = delete ; Log& operator = (const Log &) = delete ; std::mutex mtx; public : static Log& GetInstance () void PrintLog (std::string msg) auto now = std::chrono::system_clock::now (); auto time_point = std::chrono::system_clock::to_time_t (now); auto us = std::chrono::duration_cast <std::chrono::microseconds>(now.time_since_epoch ()).count () % 1000000 ; std::lock_guard<std::mutex> lock (mtx) ; std::cout << std::put_time (std::localtime (&time_point), "%T" ) << ":" << us << " " << msg << std::endl; } }; Log& Log::GetInstance () static Log log; return log; } void print_error () Log::GetInstance ().PrintLog (" error " ); } int main () std::thread t1 (print_error) ; std::thread t2 (print_error) ; t1.join (); t2.join (); return 0 ; } Output: 21 :09 :46 :687412 error 21 :09 :46 :687469 error
(2).普通方式实现懒汉单例,需要加锁 在懒汉式单例中,实例在需要的时候才被创建,而不是在程序启动时就创建。
在代码中,Log::GetInstance()方法中的实例创建部分log = new Log();
只在第一次调用GetInstance()时才会执行,这符合懒汉式单例的特征。std::cout打印时,注意需要先进行加锁操作;
1 2 3 4 5 6 7 8 9 10 11 12 13 14 15 16 17 18 19 20 21 22 23 24 25 26 27 28 29 30 31 32 33 34 35 36 37 38 39 40 41 42 43 44 45 46 47 48 49 50 51 52 53 54 55 56 57 58 59 60 #include <iostream> #include <string> #include <thread> #include <mutex> #include <chrono> #include <iomanip> class Log {private : Log () {}; Log (const Log &) = delete ; Log& operator = (const Log &) = delete ; static Log* log; static std::mutex mtx; public : static Log& GetInstance () void PrintLog (std::string msg) auto now = std::chrono::system_clock::now (); auto time_point = std::chrono::system_clock::to_time_t (now); auto us = std::chrono::duration_cast <std::chrono::microseconds>(now.time_since_epoch ()).count () % 1000000 ; std::lock_guard<std::mutex> lock (mtx) ; std::cout << std::put_time (std::localtime (&time_point), "%T" ) << ":" << us << " " << msg << std::endl; } }; Log* Log::log = nullptr ; std::mutex Log::mtx; Log& Log::GetInstance () if (log == nullptr ) { std::lock_guard<std::mutex> lock (mtx) ; log = new Log (); } return *log; } void print_error () Log::GetInstance ().PrintLog ("error" ); } int main () std::thread t1 (print_error) ; std::thread t2 (print_error) ; t1.join (); t2.join (); return 0 ; } Output: 21 :07 :23 :51614 error 21 :07 :23 :51616 error
(3).使用std::callone来实现单例
static Log& GetInstance() {
init函数是一个简单的初始化函数,它的目的是在第一次调用GetInstance时创建一个Log类的实例(对象)
std::call_once(once, init)确保初始化只会在第一次调用时执行一次,而且是线程安全的。
这是为了避免多个线程同时尝试创建实例,因此它只会被一个线程执行。
后续的判空操作,
如果log指针不为nullptr,那么这个额外的检查不会导致额外的对象创建。
如果log为nullptr,则在这里创建一个Log实例。
使用 std::call_once 可以在多线程环境中实现一次性初始化,避免了多个线程同时初始化的问题。
示例代码,
1 2 3 4 5 6 7 8 9 10 11 12 13 14 15 16 17 18 19 20 21 22 23 24 25 26 27 28 29 30 31 32 33 34 35 36 37 38 39 40 41 42 43 44 45 46 47 48 49 50 51 52 53 54 55 56 57 58 59 60 61 62 #include <iostream> #include <string> #include <thread> #include <mutex> #include <sys/time.h> #include <iomanip> #include <memory> static std::once_flag once;class Log {private : Log () {}; Log (const Log &) = delete ; Log& operator = (const Log &) = delete ; static std::unique_ptr<Log> log; public : static Log& GetInstance () std::call_once (once, init); return *log; } static void init () log.reset (new Log ()); } void PrintLog (std::string msg) static std::mutex mtx1; std::lock_guard<std::mutex> lock (mtx1) ; auto now = std::chrono::system_clock::now (); auto time_point = std::chrono::system_clock::to_time_t (now); std::tm timeinfo; localtime_r (&time_point, &timeinfo); auto us = std::chrono::duration_cast <std::chrono::microseconds>(now.time_since_epoch ()).count () % 1000000 ; std::cout << std::put_time (&timeinfo, "%T" ) << ":" << us << " " << msg << std::endl; } }; std::unique_ptr<Log> Log::log = nullptr ; void print_error () Log::GetInstance ().PrintLog (" error " ); } int main () std::thread t1 (print_error) ; std::thread t2 (print_error) ; t1.join (); t2.join (); return 0 ; }
八、condition_variable与其使用场景 01.生产者与消费者模型 生产者理解为老板,消费者理解为打工人;
当老板新加了一个任务放到任务队列中时(需要通知一个打工人去完成),打工人集体收到了这个通知,
安排一个人来完成,它就从任务队列中拿到这个任务去完成;
当任务队列为空时,打工人集体(消费者)就一直等待,不空时接收到通知,就要安排打工人来处理任务。
02.std::condition_variable 参考:condition_variable 与其使用场景
std::condition_variable可以实现线程的等待和通知机制,从而在多线程环境中实现同步操作。
在生产者-消费者模型中,
使用std::condition_variable可以让消费者线程等待生产者线程生产数据后再进行消费,来避免了数据丢失或者数据不一致的问题。
std::condition_variable的具体使用步骤:
1.创建一个std::condition_variable的对象cv;
2.创建一个互斥锁std::mutex对象mtx,用来保护共享资源的访问
3.在需要等待条件变量的地方, 进行加锁,并且等待条件变量
03.程序示例(生产者与消费者模型) 1 2 3 4 5 6 7 8 9 10 11 12 13 14 15 16 17 18 19 20 21 22 23 24 25 26 27 28 29 30 31 32 33 34 35 36 37 38 39 40 41 42 43 44 45 46 47 48 49 50 51 52 53 54 55 56 57 58 59 60 61 62 63 64 65 66 67 68 69 70 71 72 73 74 75 76 77 78 79 80 81 #include <iostream> #include <mutex> #include <thread> #include <condition_variable> #include <queue> std::queue<int > q_task; std::condition_variable cv; std::mutex mtx; void Producer () for (int i= 0 ; i < 5 ; i++) { { std::unique_lock<std::mutex> lock (mtx) ; q_task.push (i); cv.notify_one (); std::cout << "Producer put task: " << i << " This Thread " << std::this_thread::get_id () << std::endl; } std::this_thread::sleep_for (std::chrono::seconds (3 )); } { std::lock_guard<std::mutex> lock (mtx) ; q_task.push (-1 ); cv.notify_one (); } } void Consumer () while (true ) { std::unique_lock<std::mutex> lock (mtx) ; cv.wait (lock, []() { return !q_task.empty (); }); int value = q_task.front (); q_task.pop (); if (value == -1 ) { std::cout << "Consumer exiting. This Thread " << std::this_thread::get_id () << std::endl; break ; } lock.unlock (); std::cout << "Consumer get task: " << value << " This Thread " << std::this_thread::get_id () << std::endl; } } int main () std::thread t1 (Producer) ; std::thread t2 (Consumer) ; t1.join (); t2.join (); return 0 ; } Output: Producer put task: 0 This Thread 140360701269760 Consumer get task: 0 This Thread 140360692877056 Producer put task: 1 This Thread 140360701269760 Consumer get task: 1 This Thread 140360692877056 Producer put task: 2 This Thread 140360701269760 Consumer get task: 2 This Thread 140360692877056 Producer put task: 3 This Thread 140360701269760 Consumer get task: 3 This Thread 140360692877056 Producer put task: 4 This Thread 140360701269760 Consumer get task: 4 This Thread 140360692877056 Consumer exiting. This Thread 140360692877056
九、C++11 实现线程池 参考:C++11 跨平台线程池的实现
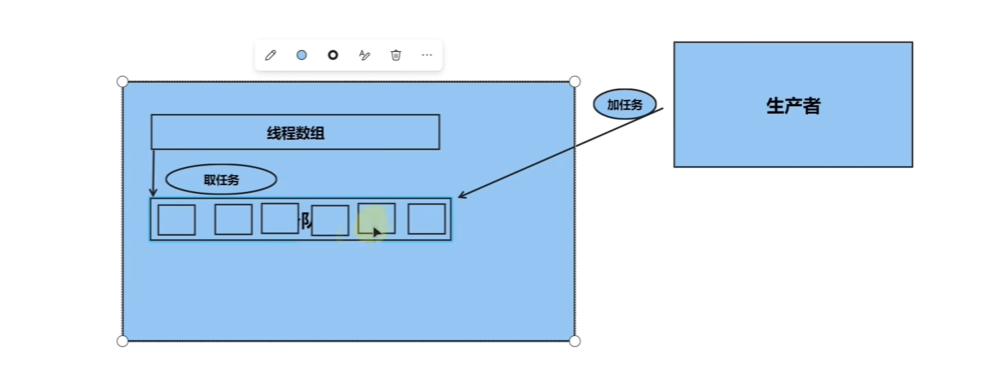
01.为什么要用线程池 线程的开辟是比较耗费资源的,所以提前维护一个线程的数组和任务队列,当有新任务添加时再让线程来处理新来的任务,
可以很好地提升程序的执行效率;
下图左边矩形里就是线程池的实现,并且是符合消费者和生产者模型的。
02.实现思路 通过定义了一个ThreadPool类,并且在构造函数中创建了指定数目的线程。在每个线程中,我们不断地从任务队列中取任务并执行,直到线程池被停止;
在add_task() 函数中,我们将任务封装成一个std::function对象,并将它添加到任务队列中;
在ThreadPool的析构函数中,我们等待所有线程执行完成后再停止所有线程;
在主函数中,我们创建了一个ThreadPool对象,并向任务队列中添加了8个任务;
每个任务会输出一些信息,并且在执行完后等待3秒钟;
由于线程池中有4个线程,因此这8个任务会被分配到不同的线程中执行。在任务执行完成后,程序会退出。
具体需要结合 C++11 标准库中的 std::thread、std::mutex、std::condition_variable、std::function 和 std::queue 等组件实现。
03.程序示例 C++线程池的实现示例,用于管理多个线程并执行异步任务,涉及到的知识点比较多
1 2 3 4 5 6 7 8 9 10 11 12 13 14 15 16 17 18 19 20 21 22 23 24 25 26 27 28 29 30 31 32 33 34 35 36 37 38 39 40 41 42 43 44 45 46 47 48 49 50 51 52 53 54 55 56 57 58 59 60 61 62 63 64 65 66 67 68 69 70 71 72 73 74 75 76 77 78 79 80 81 82 83 84 85 86 87 88 89 90 91 92 93 94 95 96 97 98 99 100 101 102 103 104 105 106 107 108 109 110 111 #include <iostream> #include <thread> #include <mutex> #include <queue> #include <vector> #include <functional> #include <condition_variable> class ThreadPool {public : ThreadPool (int num_threads) : is_stop (false ) { for (int i = 0 ; i < num_threads; i++) { threads.emplace_back ([this ] { while (true ) { std::unique_lock<std::mutex> lock (mtx); condition.wait (lock, [this ] { return !tasks.empty () || is_stop; }); if (tasks.empty () && is_stop) return ; std::function<void ()> task (std::move (tasks.front ())); tasks.pop (); lock.unlock (); task (); } }); } } ~ThreadPool () { { std::unique_lock<std::mutex> lock (mtx) ; is_stop = true ; } condition.notify_all (); for (auto &t : threads) { t.join (); } } template <typename F, class ... Args> void add_task (F&& f, Args&& ... args) std::function<void ()> task = std::bind (std::forward<F>(f), std::forward<Args>(args)...); { std::unique_lock<std::mutex> lock (mtx) ; tasks.emplace (std::move (task)); } condition.notify_one (); } private : std::vector<std::thread> threads; std::queue<std::function<void ()>> tasks; std::mutex mtx; std::condition_variable condition; bool is_stop; }; std::mutex coutMutex; void myTask (int taskID) std::unique_lock<std::mutex> lock (coutMutex) ; std::cout << "Task " << taskID << " is running on thread " << std::this_thread::get_id () << std::endl; lock.unlock (); std::this_thread::sleep_for (std::chrono::seconds (3 )); lock.lock (); std::cout << "Task " << taskID << " is done." << std::endl; } int main () ThreadPool t_pool (4 ) ; for (int i = 0 ; i < 8 ; i ++) { t_pool.add_task ([i] { myTask (i); }); } return 0 ; } Output: Task 0 is running on thread 140664486102784 Task 1 is running on thread 140664511280896 Task 2 is running on thread 140664502888192 Task 3 is running on thread 140664494495488 Task 3 is done. Task 4 is running on thread 140664494495488 Task 2 is done. Task 5 is running on thread 140664502888192 Task 0 is done. Task 6 is running on thread 140664486102784 Task 1 is done. Task 7 is running on thread 140664511280896 Task 4 is done. Task 5 is done. Task 6 is done. Task 7 is done.
十、async、future、packed_task、promise异步并发 参考:异步并发 — async future packaged_task promise
01.std::aync、std::future 的使用 std::async、std::future是C++11中的两个函数模板,用于异步执行一个函数,并返回一个std::future对象,来表示异步操作的结果。
好处:
使用std::aync可以方便的进行异步编程,避免了手动创建线程和管理线程的麻烦.
使用std::async函数来异步运行func(),它会在后台创建一个线程并执行函数,std::async 会返回一个future的对象;
然后您可以通过future的get()方法来获取函数的返回值,这样不需要显式创建线程对象,std::async会自动帮你管理线程的生命周期。
程序示例,
1 2 3 4 5 6 7 8 9 10 11 12 13 14 15 16 17 18 19 20 21 22 23 24 25 26 27 28 29 30 31 32 33 34 35 #include <iostream> #include <thread> #include <future> int func () int a = 0 ; for (int i = 0 ; i < 1000 ; i++) { a++; } return a; } int main () std::cout << "test1: " << func () << std::endl; std::future<int > future_result = std::async (std::launch::async, func); std::cout << "test2: " << future_result.get () << std::endl; return 0 ; }
02.std::packaged_task的使用 std::packaged_task是一个类模板,用于将一个可调用对象(如函数,函数对象或Lambda表达式)封装成一个异步操作,
并返回一个std::future对象,来表示异步操作的结果。
作用:
std::packaged_task可以方便的将一个函数或可调用对象转换成一个异步操作,供其他线程使用,使得代码更加简洁和易于维护。
程序示例,
1 2 3 4 5 6 7 8 9 10 11 12 13 14 15 16 17 18 19 20 21 22 23 24 25 26 27 28 #include <iostream> #include <thread> #include <future> int func () int a = 0 ; for (int i = 0 ; i < 1000 ; i++) { a++; } return a; } int main () std::packaged_task<int () > task (func) ; std::future<int > future_result = task.get_future (); std::thread t1 (std::move(task)) ; std::cout << "test1: " << func () << std::endl; t1.join (); std::cout << "test2: " << future_result.get () << std::endl; return 0 ; }
03.std::promise的使用 std::promise是一个类模板函数,用于在一个线程中产生一个值,并在另一个线程中获取这个值;
std::promise通常是和std::future一起使用的,用于实现异步编程。
程序示例,
1 2 3 4 5 6 7 8 9 10 11 12 13 14 15 16 17 18 19 20 21 22 23 #include <iostream> #include <thread> #include <future> void func (std::promise<int > &pr) pr.set_value (1234 ); } int main () std::promise<int > pro; auto future_result = pro.get_future (); std::thread t1 (func, std::ref(pro)) ; t1.join (); std::cout << future_result.get () << std::endl; return 0 ; }